A DIY that is not your typical Sunday project!
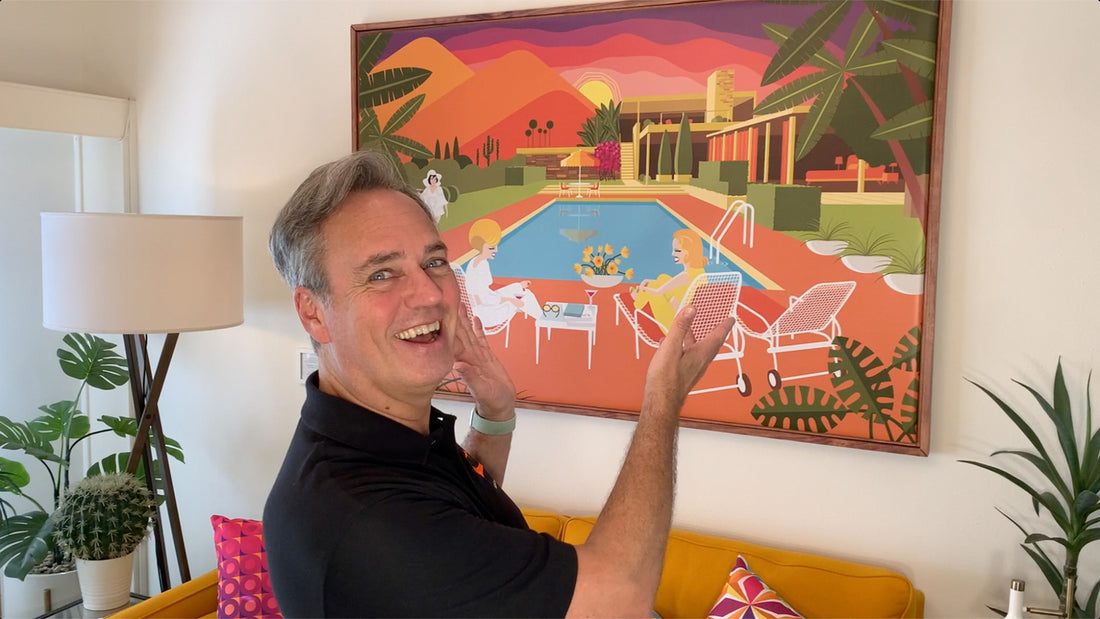
This is the story of my very first project that everyone watching the YouTube channel has been asking about: What is that wall frame behind you? And I have to say that YES, I did that myself! Both the image and the frame. But I was immensely inspired by two great artists and I have to give them credit. In a way, it's a tribute to them. I kept it personal for years but now that it shows up on most videos I do, I wanted to share with you how I made it and why it has so much meaning to me.
Oh but wait...
Someone wrote left a comment on my blog that I talk a lot and although they like my style and projects, they were more interested in trying them without the stories and were hoping for a simplified version. So for this project, I'll try something new: First a SUMMARY followed by THE STORY behind this project, then the HOW-TO part with bullet-point lists and lastly a SHOPPING LIST. It is followed by a few points of interest.
If you keep on reading, I'll try not to repeat everything in the video and instead give you extended info on how I made this huge art. If you prefer to hop right away to the crunch, see you after the break...
Don't miss the fun little BONUS at the very end!
SUMMARY - Basic Steps
- Trace or pick an image
- Order a print on Vistaprint.com
- Plan, build, stain a frame PDF model here
- Staple the print
- Finish & wire the frame
- Hang with double hooks
THE STORY
This is still one of the most complicated do-it-yourself projects I ever did to this day. To be honest, it was actually the basis for my whole mid-century modern journey. This was the spark for starting the online store, having a blog and opening the YouTube channel. So naturally, before I get into how I made it, a bit of history would help understand where this project came from...
My living room wall in my condo was once covered by mirrors. Quite typical for Palm Springs to make rooms look bigger. I had them taken down, painted everything white, and was looking for a big frame to fill up that huge wall. I wanted it to be a statement for my colorful and bold personality and a nod to Palm Springs' great vibe. But I could never find the right thing at a reasonable cost.

One day I was shopping in the design district with a friend. We were at a store called "Raymond Lawrence", now closed (I'm posting the link because years after its closing, it seems they kept the website alive!). They left Palm Canyon drive to move to the shopping center The River but only lasted there about a year if I remember well. It had fabulous merchandise with mid-mod style art and home decor, neon color plexiware, clothing and crazy fun stuff. On a side wall, serving as a display background, there was a huge reproduction of a beautiful picture. I immediately thought "this is it!!!". I soon learned from a friendly salesperson that it was the most famous picture of Palm Springs entitled "Poolside Gossip" taken by photographer Slim Aarons in 1970 at the Kaufmann House, once owned by Barry Manilow. This printed frame was of great quality and quite big but the price was accordingly set: $2000! Woopsy... I don't think so! But that image was immediately imprinted in my mind and something was already brewing.

Poolside Gossip by Slim Aarons, 1970, Kaufmann House, Palm Springs, CA © Getty
We then crossed the street and found ourselves at the Shag store. The facade is so colorful, fun and inviting. This is the boutique gallery of the world famous mid-century illustrator Josh Agle, hence his artist name "Shag", incredibly fitting of course. (For those who didn't quite figure it out, it's the last 2 letters of his first name with the first 2 letters of his last name, and in an incredibly clever way "Shag" is a typical mid-century high pile carpet style). At that time, I kind of knew who Shag was, I had seen his art at friends' houses but I had never been to his downtown store and didn't quite measure the immensity of his talent yet.

The Shag Store at 745 N Palm Canyon Dr, Palm Springs, CA. Now also in Las Vegas.
There I found my nirvana. Colors galore, fun retro style, lots of details, beautiful frames. Obviously, I got for myself some of his store items like a pillow, cocktail glasses, even socks! But or course, when it comes to "art", it's more of an investment and prices are set accordingly. Don't get me wrong, this is beautiful art that fully justifies the prices but at that time, I wasn't ready for this kind of commitment. The reason is I was only here part time and I was afraid the extreme heat during the scorching summer would damage such beautiful art. But also because Shag didn't have the oversize frame I was looking for anyway.
I whispered to my friend that we'll never find something so big, so nice, and at a price reasonable enough that if one day I come back to the condo and the print is damaged by the heat or else, I wouldn't be sorry. Of course, I knew I was asking for the impossible. I then mentioned to him that my ultimate favorite thing would be Slim Aarons picture, in Shag style, and HUGE!!! He immediately replied: I know you enough, YOU should do it yourself!!! Bingo!
That was the start of an incredible endeavour...
THE HOW-TO
First, a little advice.
Don't go crazy. Stick to basics. This is not a hard project to do in the sense of having something printed by an online service and framing it with basic tools and supplies. It's retracing a complicated subject like I did that is nuts. Plus, trying to reproduce the style of someone else is an additional learning curve so the whole project takes forever. Unless you're a bit crazy like me, stick with something that fits with you ability, preference and style. Pick something that's ready to go and meaningful to you and you'll enjoy it for a long time. The main technical reason I'm sharing the details on this frame is because I still find it amazing how low-cost this was for the size and how nice it still looks for such basic materials after so many years. Plus nothing beats the incredible satisfaction of doing something yourself, that looks so cool, and is the one and only example in the world. If you want something really big, that stays sharp for years despite the weather (country house, heath, humidity, outdoors, etc.), this project is for you!
The image
You have 2 options:
- A) Retracing an image or
- B) choosing one of your own, ready-to-go
A) Retracing an image - Tips & Tricks
- Find a very large image online to make it easier (in Google, choose IMAGES then look for TOOLS on the right. You can than add a filter for SIZE and the LARGE option
- Download the image by sliding it on your desktop or right-cliking to save it. If you find yourself with something that won't open in some apps like a ".webp" file, go back and right-click on your image to select "Open in new window" first. What appears then in your browser window will be the original JPEG or PNG version and that is a more universal format.
- Open it in your favorite drawing tool and retrace it with "vectors". Vectors allow you to change the lines, corners, color, etc. and it's sizeable indefinitely. It's also quite technical so if you've never done it or if you don't know what that is, you might want to forget about this.
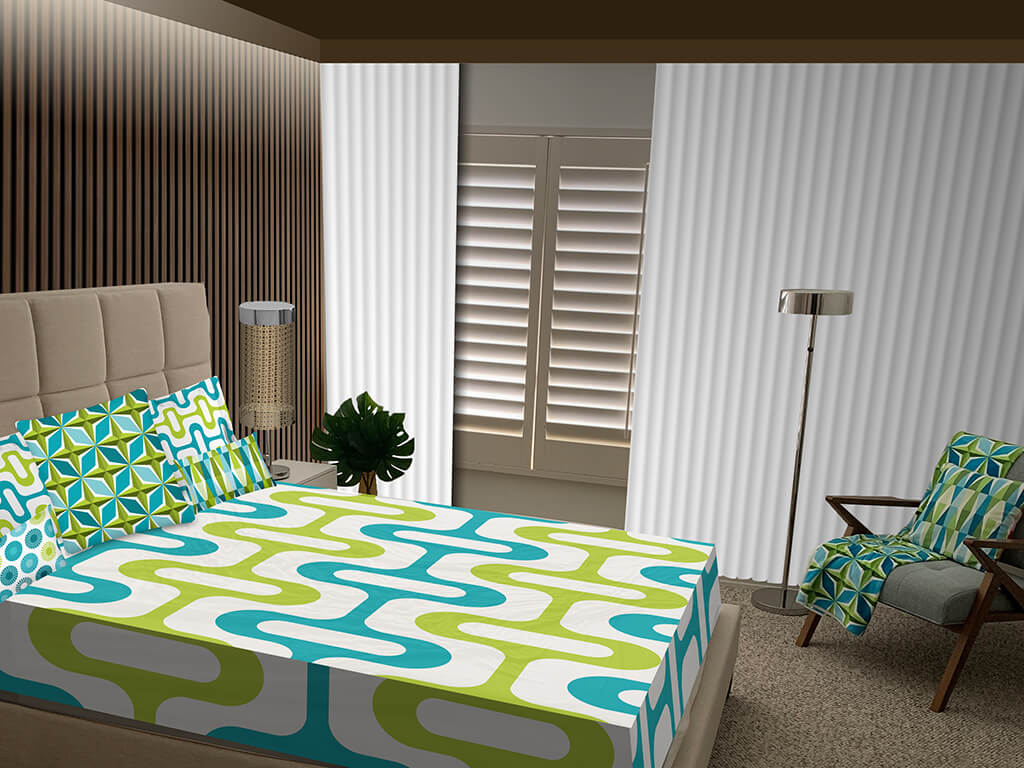
- Colorize it in a style you like. Choose a color theme or a style that fits your home or lifestyle. Make it fun and your own or as a tribute to an artist you love, like I did. Just be respectful of copyrights if it applies.*
- Export in high-res PDF
*About copyrights: a lot of people have asked me to put this framed image on totes, pillows, etc., but I consider that this art is not entirely my own style so I would never try to do that. Copyrights can take different views and can be tricky. Sometimes they let you use it as long as you don't make money out of it, sometimes you can't use it at all. Just be mindful. As for me, I prefer to design my own products for my store anyway. I've already been copied myself so I know how that feels...

Visual recap of my tracing and colorization. It took about 20 versions on the course of a few months. (animated GIF)
B) Choosing an image or design you already own
- Make sure it's REALLY high-res. For my 72" x 48" frame, it would require around 10800 x 7200 pixels at 150dpi to come out good enough. Remember it's for viewing a bit from afar so there's no need for maximum quality. Vistaprint will advise you if you upload an image that doesn't have enough pixels ("resolution" is the real graphics term).
- Don't forget the extra image you'll need around the edge for stapling on the frame. You'll lose about an inch or two of your print. Make sure all important elements appear in the middle, not on the sides.
- Make sure the subject is level BEFORE ordering. Trying to cut the image once printed is calling for problems. You may lose a lot of print estate that makes your finished frame smaller to compensate.
Ordering
These are the specs of my original order. You can choose your own size and material of course. Since my order is from years ago, I'm noting new options as well.
- Go to Vistaprint.com
- Direct link to vinyl banners is this one
- I ordered a 6' x 4' Horizontal banner
- Material: they now offer multiple types of vinyl but there was only one then. I'm guessing it's the indoor cheapest one according to price.
- It was about $50 including taxes, now $70+ (I had a coupon that reduced it to $35)
- Shipping $9 and more. Tip: Standard delivery is often faster than advertised.

Framing
- Make a detailed plan. This is key. I'm including mine below to give you an idea or you can download a PDF version here
- I made a 3-part frame: A) Inner frame for stapling, B) middle and thin decorative recess which makes the print stand out from the final frame, C) Outer frame.
- A) is hidden so it can be any wood scrap, B) and C) are stained.
- Tip: Plan ahead to avoid waste. I always draw my plan first, color-code all identical sizes, then mix them together to maximize the boards required according to leftovers. Allow leeway to take into account for losses with the cuts.
- Make it simple: a very big frame is tougher to maneuver and is aimed at being seen from a distance. Aim for simpler solutions.
- Plan for extra weight when it comes to wire and hooks. I doubled the wire just in case and opted for two separate wired sections to distribute weight.
- Staple the print as tight as possible. The middle wood sections should help hold it together without bending the sides. You'll need a good real stapler that punches securely, not just a regular office stapler that you would open.


Wood
- Premium or select pine boards (outer frame only)
- For the outer part that will show most, premium wood with a nice grain is a better choice because it's more straight, usually doesn't have knots and the shoe polish will accentuate that beautiful wood grain.
Finishing Touch
- Tip: To save time, stain the wood with shoe polish. It's easy and stays nice for a long time.
- I use paper towels
- If you wipe it too much or the wood doesn't cooperate well, sometimes a second pass can make it better.
- Don't forget to protect your working area. I use old beach towels exclusively for my projects.


Credits
I was so happy with the result, I decided to make a little description of the project, put it in a small white frame and hang it besides the main one. This way, when people come over for the first time and ask a zillion questions about it, I direct them to read the credits on the side. It's a great conversational stater and it's my way of giving credit to and recognizing the two artists who inspired me: Slim Aarons and Shag.

Gloriously sitting in my Palm Springs living room condo since 2017. The museum-style credits is just a home printer copy in a little frame from Target.

SHOPPING LIST
- Vistaprint vinyl banners $70 for 72" x 48" ($35 with coupon in 2017)
- Premium Pine Boards (or Select) Pine Boards, 1" x 2" x 8' at Home Depot $7.58 I used 8. Tip: you can use regular quality for the inner part if you can find ones that are straight enough.
- Moldings or small wood boards for the recess part
- Kiwi Brown Shoe polish Walmart $10-$12
REFERENCES
SHAG
- Learn more about the artist at Shag.com
- Online store at Shagstore.com
- Directions to his downtown store at 745 N Palm Canyon Dr, Palm Springs, CA 92262
- Directions to his Las Vegas store at 4321 W Flamingo Rd, Las Vegas, NV 89103
- The Shag Store on Instagram
- The Shag Store on Facebook
Slim Aarons
- Learn more about Slim Aarons on Wikipedia.org
- The famous photo Poolside Gossip on Getty Images
The Kaufmann House
- Learn more about the Kaufmann House on Wikipedia.org
- A fascinating article from the Palm Springs Life magazine about the history of the Kaufmann House
- The architect Richard Neutra on Wikipedia.org
FUN FACTS
Edgar J. Kaufmann who commissioned the desert house of Poolside Gossip was the founder of the Kaufmann department store in Pittsburgh and was friends with Frank Lloyd Wright from whom he commissioned the world famous Fallingwater house in Pennsylvania, one of Mrs Kaufmann's favorite places.
EXTRA! EXTRA! - A little bonus...
In 2015 during Palm Springs Modernism Week, a reunion was organized with the same two ladies, Nelda Linsk (in Yellow) and Helen Dzo Dzo Kaptur.

2015 Poolside Gossip reunion during Modernism Week in Palm Springs. Photo: The New York Times.
Here's a New York Times interview with Mrs Linsk who owned the home at the time the original photo was taken.

1 comment
Regards,
Christopher 760 620 3155