Create a mid-century modern room divider from wall shelves and a DIY wood frame
A UNIQUE ROOM DIVIDER YOU WON'T FIND ANYWHERE ELSE... JUST LIKE OUR PRODUCTS!
INTRO
First, a short video to show you how it looks in real life:
This is the most incredible project I've ever done. I’m not a carpenter, just a handyman that loves to figure things out but the result in real is simply amazing. This blog post is a bit long but it’s worth reading. I added a lot of info, plus tips & tricks.
At the end, you'll find a list of what you need, my own plan, a shopping list, and pictures. The short video above of the finished project will give you a good feel of how amazing it looks. Let me know what you think!
Here's the story and all the details of this crazy DIY project...
CONTEXT
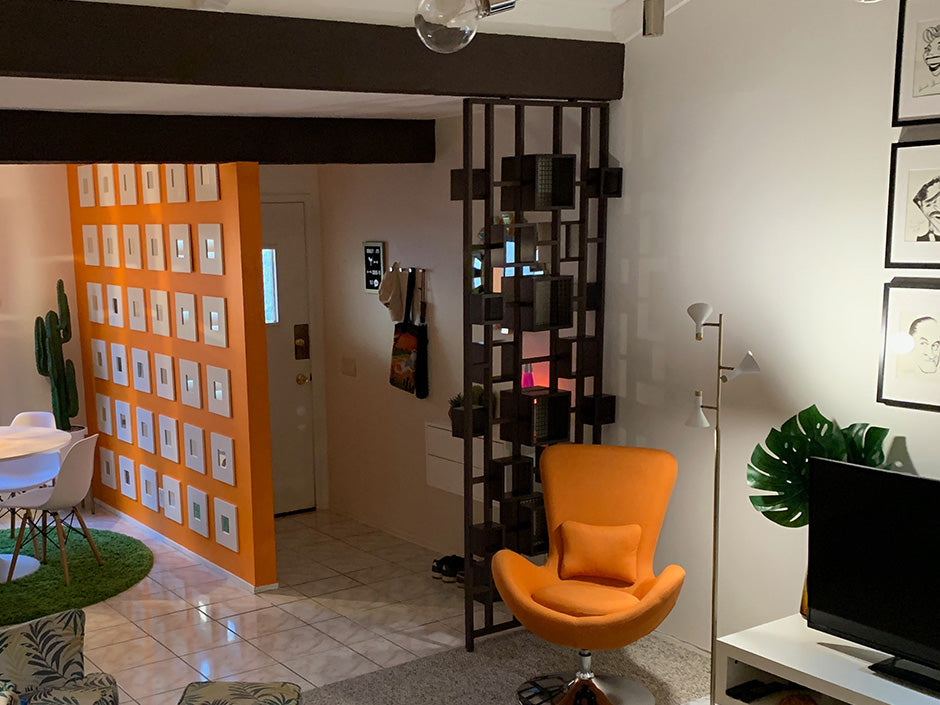
One day I decided to switch the living room around. I was setting up my office in a corner and needed wall space for the sofa. The annoying thing was that by doing so, the TV was now in plain view from the entrance of the condo. At the time, it didn’t bug me too much but I knew I would have to find a solution at one point. There was nothing nice to welcome you inside, just the back of a chair, although a very nice mid-century modern one, and the back of a TV. Yikes! So I started looking for dividers. I searched all the usual suspects, Overtstock, Wayfair, AllModern, even IKEA (The Elvarli collection was tempting). In the end, I never found anything really cool and mid-century that would fit. So I decided to make it myself. Again…
A CUBES STORY
This project made me scratch my head for a couple of years. Sometimes, it’s hard to find a solution that’s sensible, not too expensive, plus nice and durable at the same time. If I’m going to do it myself, I want it to be something to remember. That’s part of the fun. Even though I was confident I could create something cool, I didn’t want to start entirely from scratch. After months of surfing online and gathering tons of inspiration images (I included some of them in the pics), one day I got online at Home Depot for something else and boom… I see wall shelves on sale! My mind starts spinning like crazy, which is the sign that a spark has landed on my creative lightning rod. I jumped in my Adobe Illustrator software to try a few ideas and I knew that was it!!! Time to buy quickly before it disappears…
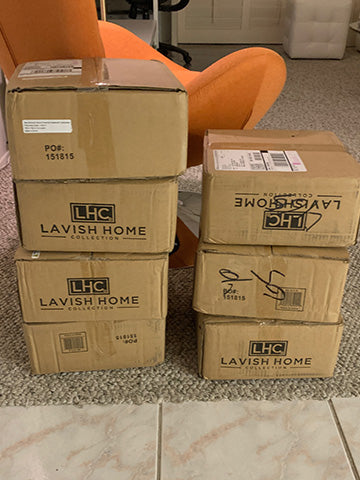
This was a kit of 3 already built dark brown wall cubic shelves in different sizes. They were on sale at almost 50% off, a steal!!! I was about to order 6 kits and after doing the count for each size, I thought that at this price, why not go for flexibility and buy 2 more. I ordered 8 kits totalling 24 shelves for less than $150! I immediately started working on a design. I quickly figured out what I could do with these but the final layout wasn't clear yet. After a week of tests, I switched it around at the last minute and the final design revealed itself.
By the way, those cubes were very poor quality but for my project and the price, it was fine. I corrected the scratches and imperfections with a permanent ink black Sharpie. Plus, I lost a ton of time removing !%@!#$*! stickers. Now here’s how to build it…
Reminder: take pictures of the boxes when they arrive, although slightly bumped, the items were fine but you never know. Delivery alert: I added a crazy UPS story at the end of this post.
PLANNING THE FRAME
The basis of this do-it-yourself project is to create a structure that will host ready-made shelves for a beautiful mid-century modern room divider. Normally, you would install these shelves flat on a wall. The thinking behind a freestanding frame is to hang the shelves on both sides in a dynamic sequence. You can follow my model or make your own. Just pay attention to symmetry and pattern, it’s the secret sauce here. Once finished, the natural flow of the boxes is critical to achieve a unique mid-century modern style. Those were my starting points. The cubes I bought are 5”, 7”, and 9” wide. The sides are 5/8” thick. I designed my frame specifically with those measurements in mind.
The reason it took me a while to figure it out is that I was always trying to put the largest cubes on the outskirt, thinking it would be nicer. The moment I gathered them in the center, everything felt right. But now, I had too many large cubes. So I doubled them in a back-to-back fashion, which sparked the idea of the metal sheet patterns in between. The largest ones are the only ones in this fashion. I was so happy to have bought the 2 extra kits since I needed more that I previously thought. Then the cubes go smaller going outwards. My final plan is a 5-column frame like this: 5”-7”-9”-7”-5”. Adjust height to your needs.
WOOD
First, you need to calculate how much wood you need according to your own project. Try to mix lengths together to avoid waste. My plan called for 8 pieces of 8 feet long. I used standard 1” x 2” wood boards (by the way, if you didn't know, in wood material, what is called one-by-twos is not 1” x 2” but is in reality 3/4” x 1.5”). By chance, I was able to squeeze those long boards in my tiny Fiat! And I got lucky twice: the 3/4” side of the boards is about the same as the cubes sides at 5/8”, making the finished project look seamless even though it isn’t identical. The main advice I can give for the design at this point is that instead of having only vertical studs to hang the cubes on, I added some middle sections or lines to achieve a more dynamic look. It made a big difference. They don’t hold any cubes but it makes the frame very solid. They're aligned with the middle of neighbouring cubes for a nice symetric pattern, a bit like Mondrian art.
Then measure, cut and mark every piece right away to keep track (makes things easier with the different lengths). Allow for mistakes. I had a bad start by using a brand new electric circular hand saw I bought for this project. Maybe I was not accustomed to this tool but cuts were not straight and I could never make two pieces the exact same length. I switched to my good old manual hand saw and miter box. My plan is colour-coded and numbered, a big helper. I tested and checked at multiple stages to avoid miscalculation errors that would have scrapped the whole thing. Make sure you plan very well and have cut all the pieces. Then you’re good to go.
SCREW THEM
Next comes the “screwing part” which is one of the trickiest steps because the smallest sections can be impossible to screw horizontally, depending on your setup and tools. Also, you’ll want to make those screws invisible in the end. I found a few tips along the way.
If your largest section is the middle one, like mine, start from the center and work your way out. For every hole, drill a “pilot hole” (a hole you drill in advance before screwing). That will prevent wood from splitting. Make sure you choose a drilling bit that’s smaller than the screws to keep everything tight. Then change the drilling bit for one that’s almost as large as your screw head and make a small indent on top of the pilot hole, from the end where you intend to screw. This will allow to screw a bit deeper and hide the head with wood filler. The larger sections of your frame should be easy to do but if like me, you have smaller sections that prevent you from screwing straight (5” wide is really tight), here’s a trick: drill the pilot hole from the outer end, then switch sides and screw from the inside, like you would have done normally, holding the screw straight in the hole (give it a few twists by hand first) but holding the screwdriver diagonally on the screw head since it’s too tight. The pilot hole reduces resistance so with control and patience, it should work flawlessly.
If you’re wondering, I didn’t use any glue, except for the 2 top spacers which were too small to be screwed in place.
TOP AND BOTTOM
The next steps are optional. I added a few complicated features but you decide for yourself depending on your skills, timeline, and the style of your project.
At first, I thought I would just screw the top to a beam. When I tested it out with the bare wood frame, something was off. I didn’t want the frame to just sit there from carpet to ceiling. I wanted it to look like a vintage mid-century piece of art that’s been there since the 1950s, floating in the air, and custom made for this hallway.
For the top, I made tiny wood spacers that have holes in the center and allow a longer screw to hold the frame to the beam. It’s just decorative but for mid-century modern stuff, final designs are stylish with clean lines, so the devil is in the details. This was really hard to do. Try to spin a drill in the core of a tiny piece of wood without the right tools...
Second, because the divider would sit on carpet and I couldn't screw on the floor, I added adjustable legs (called “Furniture glides”) not only to gain flexibility but also make sure it's firmly settled, and it would still look like it’s floating. Plus, I didn’t want it to pop out and swing during an earthquake, which are common here. You need to drill a hole to insert the leg. I had to buy a drilling bit of the right size for this. That was even more challenging. I practiced many times on wood scraps until I got it right and it's worth the extra effort since you could ruin the whole thing with a single mistake.
PREP IT UP
Now that the base of the frame is done, it’s time for filling up those screw heads with wood filler using a scraper. Let it dry long enough. Sand smooth. Adjust as needed, let dry again, sand more. During those wait times, I realized that some unfinished composite material from the backs of the cubes would show through when installed. I painted that with a small brush while waiting for the wood filler to settle. So tedious and boring!!! But you really have to do this. This unexpected extra paint job turned out pretty well and everything blends together perfectly. In the end, you really can’t tell the difference.
PAINT
Being a graphic designer, I know that colour can be tricky. I cannot repeat it often enough: test, test, test your colour in every condition possible, daylight and room lighting, morning, noon, and evening. I never thought “brown” could be so challenging though. Remember my orange wall? This was even more difficult to choose. Probably because I was trying to match it with the cubes, a completely different finish. Out of the 20 swatches I picked, only ONE really matched my cubes in every lighting scenario. Do not avoid this step and choose too quickly. Have swatches scotched to the wall, in the same location as where the divider will go, and for at least a whole day, even two. Scrutinize them and take notes multiple times during the day, with natural light, with lights on, and in your evening setup. You’ll be amazed how different it can feel. Light can go from pure white to blue-toned to yellowish, which changes everything.
As you can see in my pictures, only one swatch was making the cut, called “Black Walnut” (coincidentally, walnut is a mid-century modern wood of choice!). It's not at all the one I would have chosen at first. I went with matte paint even though the cubes were slightly shiny because I wanted to conceal possible imperfections, which is what matte paint does and why we use it for ceilings. I was so happy with that colour that I later decided to paint the beams as well, slightly cancelling the “floating” effect of my spacers on top of the frame. C’est la vie…
METAL PATTERN
As I was regularly shopping for ideas, I saw these patterned metal sheets. It's so cool, I knew someday I’d use this for a DIY project. At first, neither Home Depot or Lowes had in-store the model/colour mix I saw online and it seemed too fragile to be delivered so I waited. When the time came to shop for this project, my first choice still wasn’t available so I went along with my second choice. I never regretted it. I chose a mid-century circles pattern in old gold. I was planning to spray paint them but I changed course and they look sensational as is. Very easy to cut with a metal cutter. I needed two 12” x 24” sheets to make four 9” squares. The only tricky part was cutting out openings for the screws slits used to hang the cubes. I attached those metal patterns on 4 of the 8 biggest cubes using a crafts stapler. I only stapled them on the left and right sides (where the hanging slits are) to avoid seeing staples from top and bottom. Staples are quicker and less messy than glue, plus if you make a mistake, they’re easy to remove.
INSTALL IN PLACE
Once all of this is done, you’re ready to install the divider. Only 2 screws at the top, through the spacers, hold the divider on my beam. Use appropriate hardware according to your ceiling material. Then I adjusted the legs on the carpet until it was stiff but not too tight to allow for variations with time.
HANG THE CUBES
This last step isn’t as quick as one would think. You need to follow a plan and make measurements for each cube size. If you’ve been using or checking my plan, you now understand the extra horizontal wood pieces. Those were my references to measure where the screws go. It’s a bit hard to explain but the idea was for the the cubes to be aligned with their adjacent wood piece to make a nice pattern. So you need to figure out measurements carefully. If you look at the video and pictures, you'll notice that the cubes screw holes are neither at the top, nor in the middle. To make it work, you need to calculate how high the screw should be so the cube aligns according to plan. The way I did it is measure the distance from the middle of the cube and up to where the screw will hold, then report this on the frame using the middle of a horizontal wood piece and going up. Then use a level to copy on the other side. The good thing is that if you make a mistake, it might not show since that part of the frame will probably be hidden by the cube. This last step required 48 screws, 24 on each side. I did not use the included screws, I used much shorter screws to avoid wood splitting because I didn't want to make 48 extra pilot holes.
I hear you wondering how to align it perfectly… I measured one side for each of the cube sizes, screwed in the first screw and used a level to mark the second one. So I made 3 different measurements that were repeated 8 times each for a total of 24 cubes. To tell the truth, I still have one cube that’s not perfectly levelled and needs a fix. It might have to do with the screw slit.
DONE!
Now that it's done, I’m amazed every day how beautiful it looks. If feels like it’s been there forever and custom made for that spot. It still strikes me that I did that myself and most of all, how in the freaking world does my mind work to come up with such inventive and crazy projects!!! I can tell you this, taking your time, trusting yourself, and thinking outside the box is the best way to give your devil’s inner voice a run for his money! The more I do fun projects like this, the less I'm afraid, and the more I hear myself saying: “I can do this!”
WHAT YOU’LL NEED
- Wood: 8X 1" x 2" x 8', $30-$70 (I carefully picked straight premium pine boards)
- Wall Shelves (see below)
- Saw
- Measuring tape
- Pencil, Marker, Sharpie
- Paint
- Screws (A lot!! Medium for frame, small for cubes, longer ones for top)
- Screwdriver, Drill, Drill bits
- Wood filler, Sandpaper
- Adjustable legs
- Metal sheets, metal cutter, stapler/staples
- Glue (for top spacers)
-
Here's a link to download my planning in PDF (2 pages)
SHOPPING LIST
FLOATING CUBE WALL SHELVES
Home Depot, Kit of 3 for $30 ea, X8 (on sale at $17+tx) = $140
ALUMINUM MID-CENTURY METAL SHEET
Home Depot, 12” x 24”, $19+tx X 2 = $40
ADJUSTABLE LEGS (furniture glide)
Home Depot, pack of 4 = $2.88
PAINT
Home Depot, Glidden Premium, Matte, 1 gallon, Black Walnut, about $20
Total for special supplies: $200
PICTURES


Before you leave, a delivery anecdote...
UPS = UPSET
I bought 8 wall shelves kits in one single purchase. They were assigned 8 separate tracking numbers. At least, they were on the same route, to be delivered on the same day. That day, late afternoon, I got bored of the waiting game so I headed for the pool. When I came back, hurray, my boxes were waiting for me. But wait… only 7 boxes, not 8!!! Oh noooo! I wondered “What went wrong?” and I was afraid to have to postpone the project to the next available weekend. So I hop online and what do I find? 7 boxes delivered on “Door step” but the 8th box was not delivered because… Drum roll… “Customer did not answer”?!?!?!?!?!? Like my unapologetic neighbour would say: “Are you fracking kidding me???” Guess what… The next day, I had to go to the CVS Pharmacy to pick it up. Yup, you just can’t make this stuff up. It’s INSANE!!!! What a lost of time, gas, paperwork, workforce, trouble for the client, reputation, … I could go on forever. But hey, there’s no human life at stake here and it makes a funny story now! Keep up the good work UPS!


9 comments
After hours of looking on the internet, run across your project. I’m an eighty year old woman with lots of tools and experience. Your instructions are remarkable. Looking forward to getting started on this project. Received my shadow boxes the same way you did, three different deliveries. Thanks for the inspiration. Wish me luck😃
BTW, genius idea using the ready made wooden boxes. I would not have attempted this project if I had to make them.
I just bought a studio apartment with a tiny bedroom “alcove”. I’m a 73 year old woman who watches a lot of DIY videos. MY pet peeve is when they assume you own ALL the power tools and can easily follow complicated directions. I feel like I might actually be able to build this thing because of the detailed information you gave. I had several “ah-ha!” moments listening to you, reading your comments and looking at the photos. Thank you so much! this is exactly what I was looking for!
I just bought a studio apartment with a tiny bedroom “alcove”. I’m a 73 year old woman who watches a lot of DIY videos. MY pet peeve is when they assume you own ALL the power tools and can easily follow complicated directions. I feel like I might actually be able to build this thing because of the detailed information you gave. I had several “ah-ha!” moments listening to you, reading your comments and looking at the photos. Thank you so much! this is exactly what I was looking for!
Very nice work! Just a suggestion, and this is my pet peeve with DIY project blogs, cut your words in half and focus on more technical writing in a bulleted format. The superlatives and side comments distract from the meat of the post which is to explain how something is built and ow to do it. Just my 2 cents. But, very nice piece!