
Mid-Mod Bedroom Makeover Part 2: DIY Wood Slat Wall
The Bedroom Makeover continues with Part 2
Months after Part 1: DIY IKEA Curtain Wall, the biggest step in the mid-century modern bedroom makeover is here with Part 2: A Do-it-Yourself Wood Slat Wall project to create a mid-mod home decor without spending a fortune.
Here's the video overview of the project.
You can skip the following introduction section if you're familiar with the bedroom makeover project.
Before we dive in...
This second part of the bedroom makeover is the biggest of the 3 main parts. If you're here for the first time, the first part included an introduction that presents the genesis of the concept and how it took shape. All the major parts and sub-projects are self-explanatory so you won't need to refer elsewhere to accomplish any one of them but if you want to know more on the bedroom makeover as a whole, watch the intro in part 1 and keep reading below!
MULTIPLE SUB-PROJECTS
This is a big endeavor with multiple sub-projects. That's why I am posting them separately. An hour long article or video wouldn't make sense anyway. There are also other small projects that are related to the bedroom makeover but not exclusively, like how to fit a faux cactus in a mid-century modern planter, the IKEA Stockholm lamps hack or an upcoming wall art that's brewing and should be amazing. They will all be listed and tagged with "bedroom makeover" but they will not all be named as main parts of the bigger project, like this one.
FIND IT ALL: HUB OR TAG
To see all the main parts and smaller projects related to the bedroom makeover all in one place, you can visit the blog's Bedroom Makeover Summary Page. It acts as a hub for everything related to it with infos and all the links. You can bookmark that page and refer to it whenever you want to.
You can also open the Blog Tags drawer on top of every blog page and click the "bedroom makeover" tag to get a search results listing.
ADVICE
I came across some serious issues during this specific project. Instead of adding an update at the end to explain what happened, like I did in the video of Part 1, my remarks, tips and advice are included along the way, in the video and in this post, so you don't miss any of them.
Now, let's touch wood and dive in...
Steps
Here are the steps we'll review in this blog post for this project:
Plan
As you may know, the idea behind the bedroom makeover is to give that room a cozy and elegant feel inspired by the mid-century modern style, by creating vertical lines on 2 walls, then having led lights glowing down on them. We'll achieve those lines in 2 different ways, with curtains on the window side and wood slats on the bed side. Curtains are done (I removed them during this project) and we'll attack the wood slat wall this time.
I made a ton of preparation for this project. Even the schedule was tricky because if you include shopping, wood work, paint, filming, all happening while having all the furniture in the other room on top of sleeping there, and while I need to do my day job, planning became critical to avoid a huge daily chaos.
You've heard me before about making a detailed plan and prepare thoroughly for every project but this one was special. I'll spare you my crazy calendar with two dozens events over one week but here's the floor plan.
Take my advice, if you try this at home, plan ahead!

The curtains (pink) were done in Part 1. The lights (blue) and moulding (green) are coming next in Part 3, the final part. In this project, we're doing installing wood slats (orange) over a black wall, the one at the bottom. The outlet (yellow) on that wall will be the deciding factor on how the slats will be installed. Notice that the moulding and lights are not equally distanced from each wall, that's because of the shutters and curtains.
If you haven't seen the DIY IKEA quick hack nightstands project, note that they are not free-standing units. The legs were added for decorative purposes only. These are transformed storage units floating on the wall, firmly attached through a screwed metal bar to allow for the push-open drawers, a nice feature that I really like. I had to remove all the hardware and instead of screwing them back on the slats, I'll insert some of my cut scraps of wood in the gaps on the same spots, and re-attach the metal bar using longer screws. All this just to keep the slat wall intact in case I change my mind one day. Once back, they should be slightly under the glow, as well as the headboard. Well that's the idea at least.
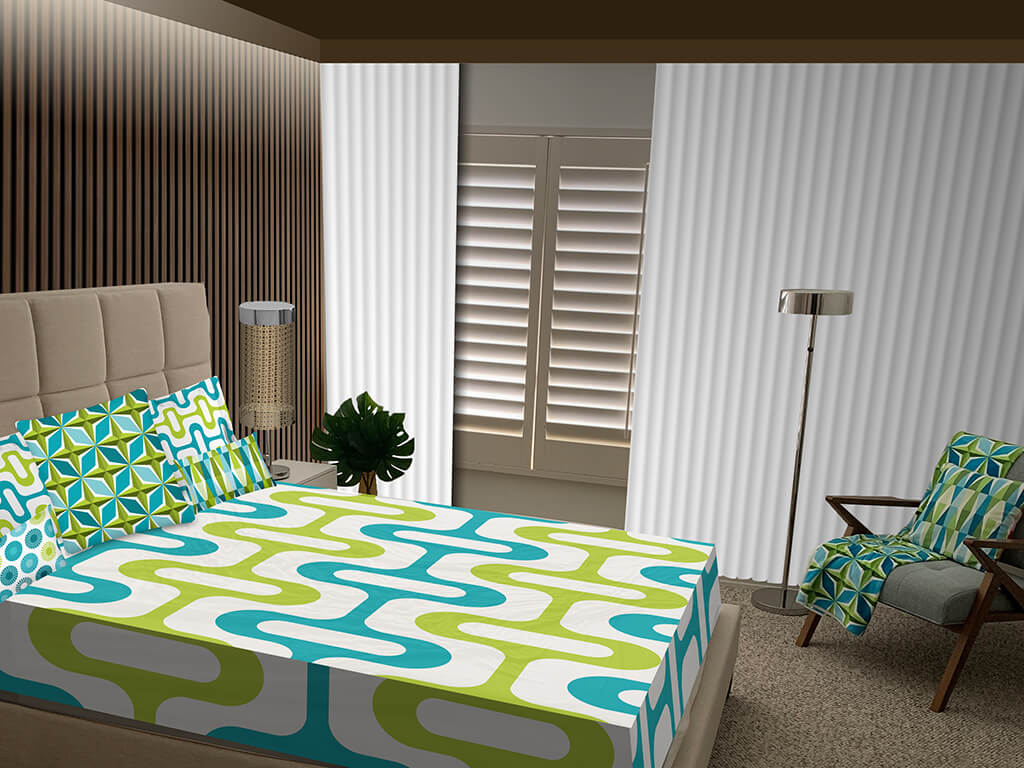
Since I'm a graphic designer, here's a visualization I created to have a feel of the final look with the furniture back in, once the whole makeover is done.

Supplies
Here's the shopping list for my 13' by 8' wall using 52 boards. Adjust according to your own wall and its specific features.

- Wood: 57 select pine boards, Lowe's and Home Depot. $368 for 52+5 extras (Regular $7.58, bulk $6.45 - The Lowe's link has a wrong pic with a wood knot on the board, they really don't have knots at all.)
- Conditioner: Minwax water-based Pre-Stain wood conditioner, 1 quart (32 oz), Lowe's $18 (they seem to already have a new packaging for the can)
- Stain: Minwax Premium Semi-transparent water-based wood finish, color Special Walnut, 1 quart (32 oz), Lowe's $17
- Paint: Valspar paint+primer, Interior Ultra, Flat finish, Base C, color Tricorn Black, 1 gallon, Lowe's $31
- Sandpaper: SandNET Reusable Sanding Block, includes a 10-pack assorted sheets, Home Depot $12 (I ran out of 220 so I had to buy a 10-pack of 220 later on for about $10, not included in the total)
- Rags: Lint-free paint rags, 10-pack, Lowe's $3
- Liquid Nails: 1 10oz tube, Home Depot $2.50
- Brad Nails: 1-1/2" x 18 gauge, 1000-pack (at about 6 per board, I used a little over 300), Lowe's $10
- Don't forget: Paint supplies (roll & handle, protector, tape, stirring stick, pan & sleeve, ...), Caulk gun (for liquid nails).
Total: $462 — Not including: Painting supplies I had on hand, common tools, caulk gun, and my brand new $217 Brad nailer kit with battery and charger purchased a few months prior specifically for this project.
About the Brad nailer: If you're wondering, I love it, it works like a charm, I especially like the fact that it's wireless, doesn't need a compressor and can take nails up to 2 inches. Plus Craftsman tools have a good reputation for reliability. Many reviews mention that it jams often but as I point out in the video, I only had one jam for about 300 nails and it was super quick and easy to fix. If you get one, do some research to make sure that the gauge and features fit your needs. From my own research, I opted for 2" gauge 18 nailer because it seemed to be a good balance between a firm hold but still an almost invisible hole. With the added grip of liquid nails, it turned out exactly as expected.
Now let's talk about the main course...
Wood Options
The main supply is wood of course. Most wood slat wall projects I found online use plywood that they cut into slats and I have to admit, some did a pretty good job. If you have the space, tools and help, it's a great alternative because since you're saving so much compared to ready-cut wood, you may be able to afford a more fancy wood type veneer. But it's absolutely not practical here in a condo complex. I don't have the space, pro tools or the help to maneuver around with those big sheets, even if they were cut into smaller pieces at the store. I always try be autonomous in every project I do so that everyone can try it by themselves. And don't forget transportation or delivery. Personally, I didn't really like the kind of edges you end up with plywood. In my room, the doors are sideways from that wall so the edges will show way more than if you were entering facing the slat wall. These are all the reasons why I decided to go with ready-cut wood instead. Make sure you think about all this before making a definitive choice.

Ready-Cut Wood
The cheapest option for ready-cut wood is common pine boards. But those boards are quite rough and require serious sanding. Plus they often have many knots, not to mention they're barely straight. I use those for basic projects when the wood won't show much or is destined to be painted.
The next best option is Select or Premium pine boards. They come in a variety of sizes and for most wood, you get a rebate when you buy in bulk. I found out about the bulk rebate only later, after a few visits, so if you can pack enough in your vehicle, you'll save a few bucks. You can also buy larger boards and cut them yourself if it suits you better or if you want to create a custom pattern and not rely on the board's width.
Shopping

I got most of my wood at Lowe's because they seemed to have nicer wood with less patterns in it. I had to make many visits because my Fiat is so small. But still, every time I went, I could only find about a dozen perfect boards so in the end, I decided to pick up a few at Home Depot as well to supplement my stock, even if the grain was different.
The Crooked Board Member
At first, I was only checking the grain and defects of the boards. Once I got home with the very first batch, I realized that one of the boards was crooked sideways enough to make it unusable for my project. I took it back and that's went a long and frustrating process took place at every visit: checking if the boards are straight, curved, or crooked. Below, top half, is one of the worse board I came across one day. That's pretty amazing, if you ask me!

Above, lower half, is a less dramatic example but you still have to figure out if you'll be able to bend is easily enough to fit in on the wall and to stay there without popping out. Remember we're only using glue and brad nails.
How to Choose your Boards
When in the store, you can use the large metal shelf support in front of you. It's usually long enough to be used as a reference. You can also use a column in the store or even the floor if you have too. This may sound over the top but you'll be surprised at how imperfect most wood boards really are. Every time I went, I would pull out from the shelf every single board and test it on all its sides and make 3 groups: those that I like and that were straight enough, then a 2nd optional batch for those that may still work because they're only curved forward or backward, and finally, I would put aside all the rest. Once I went through the whole current stock, I'd put everything back nicely and most of the time, I'd leave with less than a third of the available boards.
The first time I started doing this, an employee came over and asked what's going on. After explaining, I asked permission to play with their wood, as well as film in the store, and Lowe's was always very gracious to me. All of this took a long time. Plan ahead because no one is going to walk into a hardware store and quickly drive home with 50 beautiful ready-cut boards in one shot... Ordering online is obviously out of the question. It was the same at Home Depot by the way and what's funny is that in the video, the wood with the most grain is from Home Depot and at first, I thought it was too much. But those boards came out so beautifully, probably thanks to the conditioner, I might change my mind if I had to do it again. (I also filmed at Home Depot)
Note that you may find cheaper or different materials locally depending on the stores around you but that's what I found here in Palm Springs. If you find other great options near you, leave a comment to help others.
The race and trouble to get all the wood (and a dose of procrastination), are some of the reasons why it took so long to start this project, months after the curtains were done.
How Much to Buy
We'll be using wood boards called one by two by eight (1"x2"x8'), distanced equally from each other by the same amount as the width of a board. The wall will be painted black so that the dark space between slats will highlight the wood. But in reality, in lumber talk, the measurements are rarely as advertised. Those boards really measure 1-1/2" x 3/4" x 8', it's weird but that's a lumber supply twist and I have no clue why it's like that. I know most people know this but I mention it just in case.
With all this in mind, if you want to achieve the same pattern as me, all you need to do is to divide your wall by 1.5 inches and divide the result by 2, because half your wall will be wood slats, the other half is empty space. This should give you the minimum number of boards you need.
Here's my own calculation:
- 13 feet wall = 156 inches
- 156 ÷ 1.5 inches = 104
- 104 ÷ 2 = 52 slats + 52 gaps
Don't forget to get a few extras. I needed some for stain mistakes and even one board that split after applying the conditioner. We'll talk about that later.
Cut + Sand
I decided to work on the balcony because some steps require ventilation and it's impossible to work inside with an open window while the A/C is on since it's already 95F here in Palm Springs. I needed to rush every day before the hot sun shines on it.
Find the Right Cut
It took me 3 attempts to find the right height to cut my boards because I discovered that one end of the wall is shorter than the other, and I factored in the wiggle room of having carpet in the room. The boards are roughly 96 inches and I'm cutting them at 95 inches. Since it's a very small cut, I opted to use my rotating hand saw instead of my portable table saw. I think it went faster this way but you may have a different view.
Boards are not Created Equal
Before cutting the wood, understand that boards are not evenly cut in the first place. Go figure. This means you can't just cut say 1 inch from every board. Instead, take your own measure and mark your boards. I felt using the measuring tape would be time consuming for 52 boards so instead, I made a reference board cut at 95 inches and used it to duplicate the marking on the rest. I then cut them one by one. A little tip, keep the scraps, they'll be useful later.
Choose Sides
Once they're all cut, time to choose sides! Have a final look at your supply. Pick the right side on each board. To make things simpler, if the side without the sticker was nice enough, I went with that. That's why I didn't bother with the stickers for most of them. If the side with the sticker was much better, I removed the sticker and marked the other side with an "X" to remember which side I'll be using. Same for the boards that didn't have a sticker in the first place. You'll find it very useful later and this way, you don't need to prep all 4 sides.
First Sanding
Once your selection is done, sand them slightly on the 3 good sides just to remove imperfections, slivers, or bad spots due to handling. In general, a 220 sandpaper should to the trick. I also sanded the edges to round them off very slightly because some had a few defects here and there.
Clean your boards after sanding.
The SandNET product I found and mentioned in supplies is really good. The interchangeable pads stick like a velcro, you can clean or vacuum them, and they work well. Plus it's cheaper in the long run since you only have to get new pads instead of throwing away the whole thing. I still don't have a rotating sander but I may consider it if I have more big projects.
Pre-Stain + Sand
This is an optional step that I had not planned at first. But then I thought since I've never stained wood before and I was doing it with a basic wood type like pine on a wall that'll be in my face every day, I might as well put all the chances on my side and try it out. I found it made a positive difference. Your mileage may vary.

What this does is it creates a blocking layer inside the wood and evens out the grain. From what I learned, the bigger variations in wood texture absorb the stain differently and some kind of "zebra" style result. With this extra step, it'll be more even because it won't penetrate as deep. The wood did look way much better after this step and more uniform. It does bring out the grain a lot, which required sanding touch-ups, but this gives you the chance to correct it in advance.

Funny anecdote, I realized that one of the boards was split almost in two, diagonally from top to bottom, after conditioning. I'm not sure if it was a hidden defect or one that I missed or if the conditioner caused it. But this proves that getting extra boards is essential.
Timeline:
- Takes about 2 hours
- Wipe them after conditioning to remove excess that might get sticky if it dries out
- Let dry
- Note: I waited a bit too long after the pre-stain+sanding and I lost the advantage when I got to the last boards
Second Sanding
Because so much grain comes out during conditioning, you'll need to sand again slightly, just on the ones that popped out. On rougher spots, start with a 120 and work you way up to 220. Again, don't forget to clean the boards after sanding.
Stain
This is the big step.
I have to admit that here, I made a fool of myself and put the cart before the horse. I am a hyper meticulous person. I never undertake anything new without research, advice, videos, and especially reading instructions from A to Z. But there is an exception to everything and this was one of those days. I was too excited and didn't think it through.
When I opened the can of stain, I was expecting a rather watery liquid. It's water-based after all. In my mind, never having used stain before, I thought oil-based must look like oil and so on. But when I saw the paint-like thickness, I thought it was made on purpose for the unprofessional weekend painters, just to make our job easier. What I didn't understand was that this is a water-based, which I chose on purpose for ease of cleaning, but the thickness was just that and it really wasn't paint, or oil, or else. And is says black on white to use a rag to spread a light coat, then do it again if necessary.
Oh boy, what a deception. My first tests made me miserable. I thought that was just incapable of achieving this. But I was just doing it wrong. I was trying to paint. The more I put, the less grain I saw. The less I put, the more ugly it got.
When I reached the point of surrender, I went back online and saw most people using a rag. Why? That's when my brain cells kicked in, took me out of lethargy, and forced me to read the directions on the can. And I saw the light... Even I can forget such basic stuff. I was probably already very tired. Oh well.
Here's how I finally did it:
- Distribute some stain on a board, either with a rag or brush
- With a lint-free rag, spread it out and wipe it off to achieve a light and uniform coat
- Repeat on 3 sides
- Let dry
- Repeat if necessary or for a darker color (I did not)
- Took me about 5 hours
And that's it! Once I got the hang of it, it became an easy repetitive process.
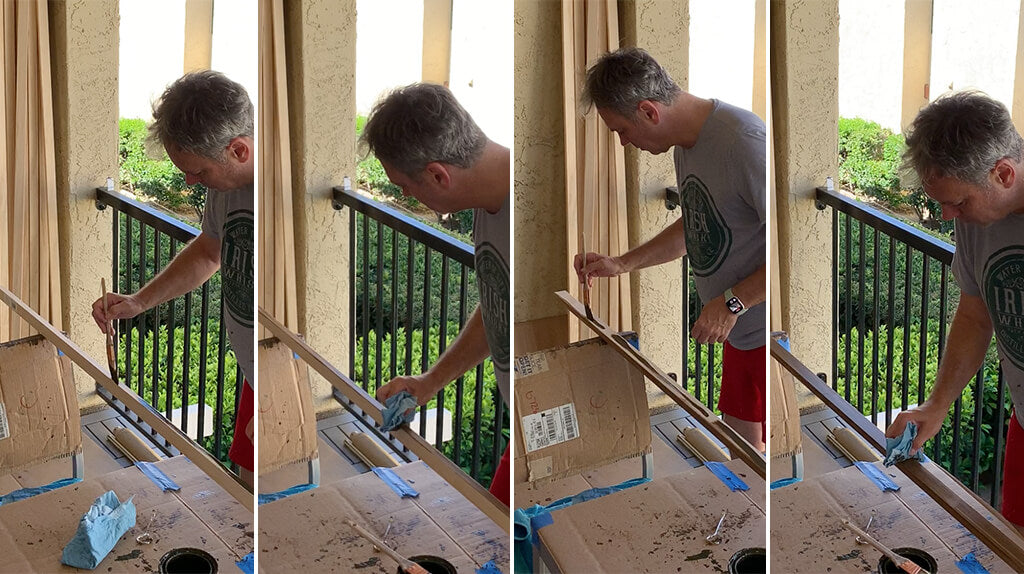
By the way, lint-free rags is absolutely essential. And still, even those that are lint-free will let go of some fabric when they get too soaked with stain so make sure you're at least using the right ones. It says so on the package.
Once all the wood was stained, I let them dry completely and brought them inside to get acclimated to the A/C while I was prepping the wall.
Black Wall
Time to paint! This is easy, of course. For the paint, I didn't want to spend on luxury paint like I usually do or fuss around with color choices and multiple options. I went to Lowe's paint counter, quickly explained my project and asked for the cheapest option to paint a black wall serving as a background. The nice girl swiftly replied that they have this basic extra dark flat paint that'll be perfect. I did two coats. It worked as expected.
Here are some personal tricks for painting:
- Wrap: After first coat, wrap your material in Saran Wrap or plastic bag
- Rolling stick: Use a telescopic stick for the roller to get the ideal length for you in your room
- Can: Punch 6-8 holes around the cavity of the can border to let extra paint drip down
- Rolling: When rolling, make 3 zigzags on top half once. Make a second pass to even out. Pick up more paint and do the same on the bottom half, overlapping in the middle. This way, you'll always mix wet paint and avoid streaking.
- Touch-ups: Flat paint is more fragile. Plus my wall is textured in the typical Palm Springs orange peel style. Once the project was over, I had many touch-ups to do because of scratches and bumps that got scrubbed off, mostly because of the spacer. I used a big black Sharpie for small dots, it's quick and easy.

Installation
Categorize
Because the boards did not come out all uniform and identical, and some had a defect here and there, I categorized the slats in batches on the other wall while the paint was drying. I looked at each board carefully, chose all the best ones and put them in one batch. Meanwhile, all those with a defect were set aside. I had different things happening like a scratch, darker spots, too light, bad sides, etc. The "middle of the road" leftovers were collected together.
Let's Play Switcheroo!
Once the wall was dry enough to use, I took the time to figure out the blind spots, which is where the furniture and headboard will go so I could use that space to hide the less-than-beautiful slats. I then began to distribute the boards on the black wall accordingly, allowing for some leeway since this is still an approximation at this point. That's when I started playing Switcheroo for a while, like a giant puzzle. As a graphic designer, I knew that if I didn't mix them well or without a plan, I might end up with an unpleasant permanent pattern. So it was essential to mix them very carefully.
Here are a few tips and advice:
- Categorize your slats in batches: Best, Midway, Defects
- Start by distributing the bad ones around the blind spots
- Add the best ones all over the wall in an even pattern
- Complete the first pass with the medium leftovers to fill the empty spaces
- Then start shuffling them around to even out zones and spots
- Too many uniform ones in a row creates a bland zone
- Too many bad or dark ones together creates a zombie effect
- Mix them by looking at it as a whole, as if it was a giant painting
- Never leave 2 of the same in a row (2 dark ones will create a shadow stripe with the black wall, 2 light ones in parallel will pop out too much, etc.)
- Step back constantly to assess the overall appearance
- Replace the defects behind the blind spots if they got pushed away
A word about the side edges...
Make sure the best side edges are on the good side if it matters in your room. In my case, the door is on the left so that side of the room got all the best side edges. That meant that some slats had to be rotated 180°. I made sure that the really bad sides with too much stain stripes, something that happened often, were all on the right half of the wall, a side facing the window that'll be less viewed from up close.

Why the trouble? A Designer’s Perspective
Why bother do it on the final wall and not just where they were, you may ask?
Because if you think of it as pure objects, stained wood slats are just dark brown lines. When on a white background, your eye has to work harder to manage the big contrast. To regulate how much light gets into the eye, the iris opens up with dark colors and gets smaller with too much brightness. If you do this on a white wall, the iris doesn't know what to do and it constantly tries to adapt depending on where you look. This process artificially blends colors and blurs details. On a black background, there's much less contrast. Your eye has an easier time differentiating all the subtleties of the slats. This means that the wood grain becomes more visible... but defects do too! So it's important to figure it all out in advance. I personally had fun doing this.
Once I was happy, I moved the slats back in the exact same order and started the installation.
Switcheroo was a game on the Price is Right where you had 30 seconds to insert numbered cubes to fill in the prices for a car and 4 smaller prizes, with a second chance to switch them around...
Choosing a Starting Point
Before nailing the first board on the wall, you need to figure out where you're going. This will all depend on your specific wall. Mine had an outlet and I wanted to make sure I didn't end up with a strange cut. I brought back all my little wood scraps from cutting and put them against the wall in a pattern that mimics my upcoming boards installation and the empty spaces. That's how I knew that starting after the outlet with an empty space, I'd get the the end with a board and a bit of leeway left. Same for the other side.

Now that everything is planned and setup, it's time to build a slat wall!
Glue, Spacer, Nails... Repeat
Surprisingly, the installation went smoothly and was very easy. I honestly think that all the preparation played a big part in the success of this final step.
A few tips before starting installation:
- Spacer: Before moving on, prepare an extra piece to use as a spacer. Cut it shorter to make it easier to remove. Make sure this guide is straight.
- Tools: Before preparing each board, make sure you left your nailer and spacer within reach at the next working spot.
- Nail Planning: Figure out in advance spots for nailing. If you have a headboard like me, nail your first board accordingly. I put 6 nails on each board. 1 on top (hidden by future moulding), 1 at the very bottom, 2 in the down half behind the headboard, and 2 on the upper portion of the wall. I then followed those virtual horizontal lines for the rest. Overall, there are very few visibles holes and you can't see them unless you really want to find it.
- Liquid Nails: Short stripes at each end, beads in the middle. Don't put too much to avoid side spills.
- First Board: Chose one that seems perfectly straight vertically and level it on the wall in your chosen starting point. This is the critical step that will determine the rest.
- Brad Nailer: If like me you've never used one and you don't hold it firmly enough, nails might stick out. Put your nailer sideways to make a vertical hole, less visible from afar.

How to install each board after the first one:
- Put liquid nails
- Put the spacer against the last board
- Put the new board against the spacer
- Squeeze it all together and hold firmly
- Nail down
- At each nailing spot, hold tight to keep it level
- Repeat
The whole installation took about 4 hours.

A little note. Make sure you don't calculate to tight because once you get to the farthest end, it might not end up exactly like planned. I found myself with a very tight space. But I got lucky, every thing fell into place really well and I absolutely love how it turned out.
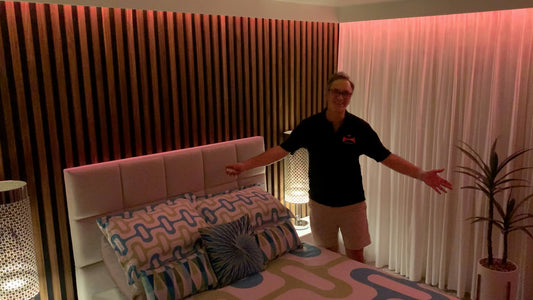
Here's a sneak peek of the final result with the furniture and curtains back in the room. It has a wonderful mid-century flair with rich texture and clean lines. I pinch myself every day for how nice this bedroom makeover turned out to be.

This photo was taken after the moulding and lights were done. To learn more about the real finished bedroom makeover, watch this space for Part 3 soon!
And we’re done!
To be honest, this was such an enormous undertaking, I often had doubts. But in the end, it's so rewarding, I cannot even start to tell you how happy and excited I am. Every time I'm in the bedroom, I'm in awe of how warm wood feels and how beautiful it is in all its simplicity with such an elegant and timeless mid-century modern feel. Having achieved it myself is the cherry on the cake.
I hope this project inspires you to try it yourself. And if you do or have any questions, please leave a comment!
See you soon for the last part coming next, lights! (Here's a hint... it's GORGEOUS!)
Until next time, ciao!
One more thing...
Some of you may have noticed that in the photo above, the moulding and ceiling are still white. In the original concept revealed during the intro of Part 1, I did say I was planning to paint the ceiling dark brown. As I mentioned in the video, I'm having second thoughts about this. I'm afraid it would make the room too dark. I haven't decided yet but it looks so amazing that for now, it's on hold.


3 comments
Wow! What an informative blog post. I feel anyone would be able to complete this project with your amazing advice. Thank you!
Good info, BUT the nervous giggling is very annoying.
Thanks for sharing. Amazing job.