DIY cactus display: make a faux succulent fit in a mid century pot
Faux can be so cool!
UPDATE: Above is a video I made related to this project about a year after the blog post. I had bought a new faux plant with a smaller planter this time. Since I had done a couple others like that during the year, I had found that standard faux plants and smaller planters don't require the same steps. The article below talks about creating legs or columns to support a cardboard topper, plus a step about filling the plant's pot with scraps to prevent pebbles from falling. These steps only apply if the plant's pot is much smaller than the planter it's going into and if the shape of the plant is hard to cut out in the cardboard topper, like for a star-shape cactus. As you'll see in this video, with a smaller planter and a regular plant with normal trunks or branches, the topper will be much easier to create and it will simply hold by itself, making those 2 steps useless. So keep that in mind if you try it out yourself depending on what you start with.
Now back to the original post...
Here's a long post for a very simple do-it-yourself project. I came up with the idea of making it a blog post because like a lot of people, I had a beautiful artificial plant worth a lot of money without anything nice to display it in. If you think about it, being fake makes those succulent maintenance free, but at the same time, we easily forget what kind of display item we should use to make them shine.
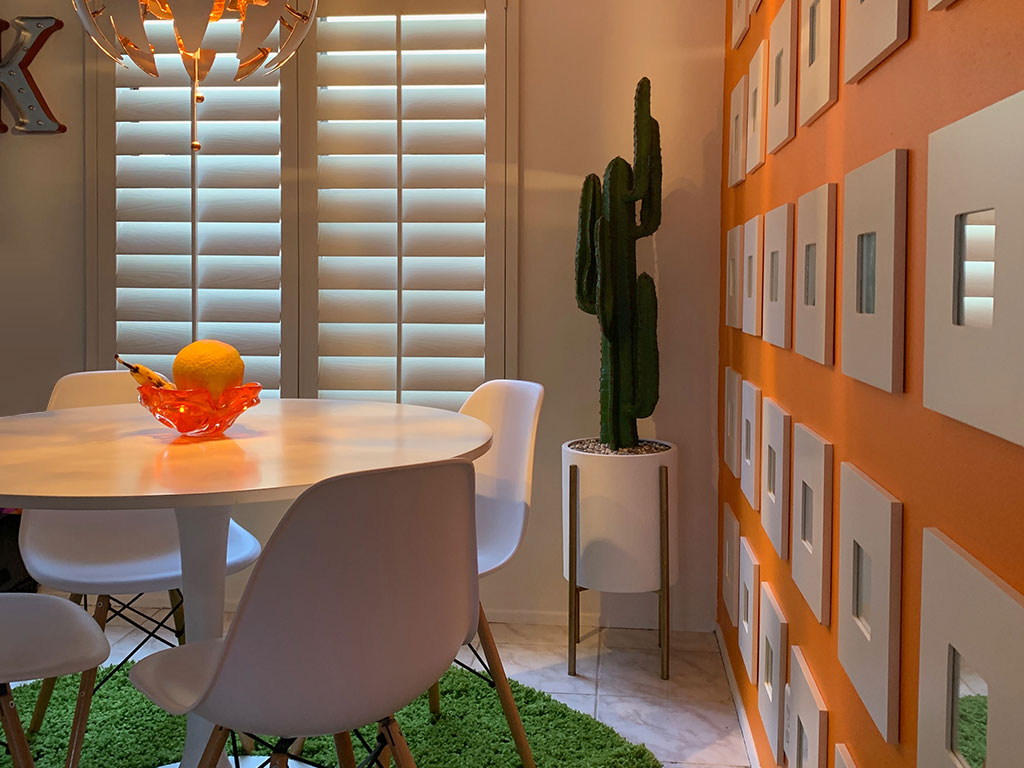
Mine is a gorgeous cactus I found online, it's quite tall and very real looking. It took me almost a year of online shopping to find the right cactus at the right price. But like most artificial plants, It comes in an extremely tiny but heavy pot that holds it straight. Such a small pot for a huge plant, it looks a bit stupid... I wanted a bigger and nicer pot, and of course mid century style!
At first, I found some pretty nice pots at high-end stores but they cost a fortune since they're made of concrete and wood or expensive metal. After shopping around a lot, again, I finally settled on one from World Market because it was a good quality/price ratio. This one was trompe l'oeil, made of a thin cheap metal sheet, folded to mimic thickness with a stucco-like finish that made it look like being made of stone and heavy, even though it's fake (like the plant it was about to welcome...).
The first problem I had though is that the white model was out of stock and the last one available was grey. Yikes. If you're like me, you'll understand why I immediately thought "Let's have it NOW and give it a quick makeover". The second problem is that the opening was quite large. Although that's exactly why I wanted this pot, I had to come up with a solution to make the cactus fit. So here we go with the plan...
Step by step
There are no special supplies to get, just cardboard, tape and usual household stuff. Here's what I did.
- PAINT the pot white. I used a leftover of ceiling white paint. Perfect for a concrete or stucco look since it's not shiny. Tip: to turn the pot around while painting, I used a paint stick that was the same length as the inside, a pure coincidence. Let dry completely.
- MEASURE up the inside height necessary to get the border of the cactus to the top of the pot, less an inch or so to allow for decorative filler.
- TAPE the plant to plastic containers to reach that measure close enough without going over (the Price is Right fan here...). I used yogurt containers. Tape them upside down so the larger diameter acts as a good footer. Stack as many as needed to lift the plant and reach the border of the planter. Don't worry about stability, it will all hold itself in the end.
- TRACE & CUT a 2-parts circle that will fit the whole top of the planter from the inside, with a hole in the center to let your plant through. This will act as a base for the filler. You don't want to have to fill the whole thing with rocks. To make this circle stay put, we'll create columns for vertical support and stability.
- CREATE 2 cardboard columns: long rectangles with teeth for insertion. Each one will be V-shaped for strength so don't forget to keep a center fold (don't cut through!). Tape the teeth to prevent paper splitting.
- REPRODUCE the teeth of each column on each part of the top circle. Cut it out but not too loosely. A tight fit will provide a better hold. Test the fit. If too loose, tape the teeth some more. Then, test the whole system together.
- FILL the artificial plant with pieces of cardboard until reaching its top. This will prevent pebbles from falling under if there's an open spot, considering the star shape of a cactus.
- INSERT the whole thing in the final planter. Tape both half circles together when you're satisfied with the fit.
- MOVE the plant to its final location right away. You'll want to check out how it looks first and you might have to turn it around a few times and adjust things here and there before the final touch. Check for stability issues but the last step should provide a bit of weight.
- FILL with pebbles from a dollar store. Voilà!


What you'll need
- Paint
- Cardboard
- Yogurt containers
- Tape (duct, masking, clear, ...)
- Pencil and ruler
- Cutter (X-Acto)
- Pebbles: a few bags, Dollar store $3-$5
Shopping notes
Cactus: Artificial cactus from Overstock $165 (at the time, with coupon)
Planter: World Market Large Grey Planter with brass stand $35 (with in-store rebate)