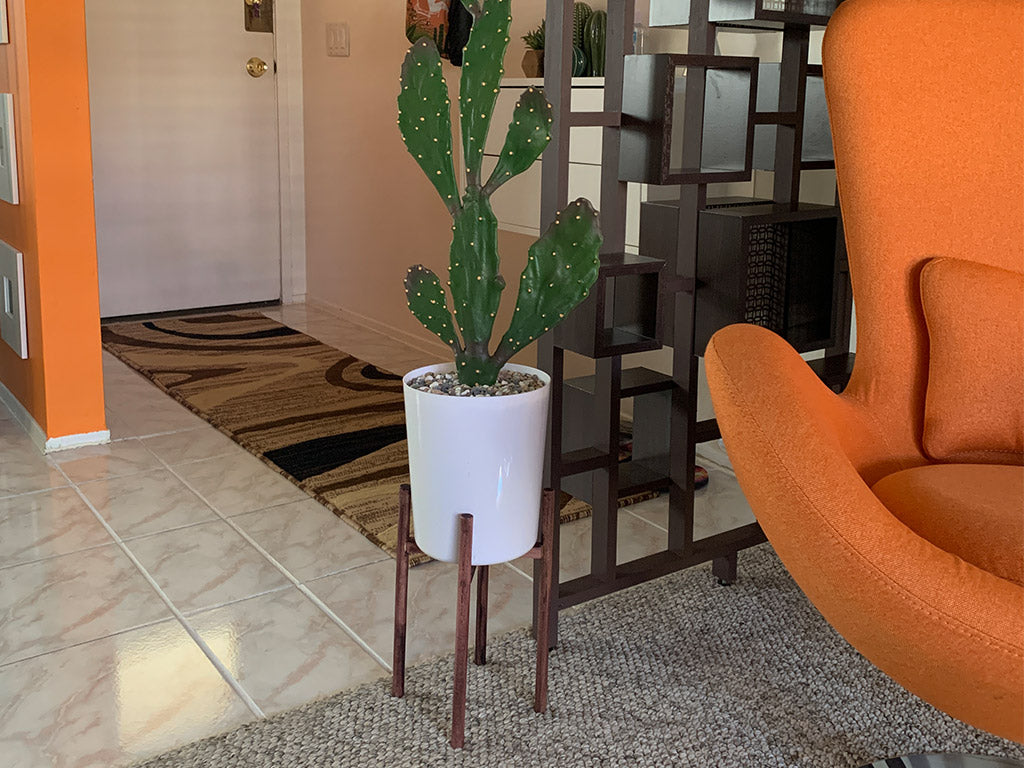
Create a mid-century modern DIY planter on a stand for an IKEA faux cactus or plant

If you've been reading this blog, you've seen the DIY project to fit a huge faux succulent in an existing planter on a stand. I'm not going to do the same thing again. That's because I bought more artificial plants, this time it was the IKEA Fejka models, but I didn't have planters around and didn't want to spend too much. So I decided to it myself, again!
This blog post is about "creating" a planter on a stand from scratch and without breaking the bank, plus I already had everything on hand, except the planter itself. If you're a bit handy with wood and tools, it should be easy. It's very cheap and it does the trick perfectly!
To make things quicker and easier, I'll use a bullet point style tutorial. I didn't include a shopping list since you might have many supplies on hand as well.
WHAT YOU NEED
• PLANTER: Find a planter. If you don't have one lying around and you get caught off season shopping for one, just like me, think outside the box and find something else to act as a planter. It's only an artificial plant after all. After doing a dozen stores, I finally had a stroke of genius and bought a $5 bathroom accessory kit from Walmart (trash, soap dish, toothbrush holder, and glass—I couldn't believe the low price!). I kept the trash can as my planter and gave the rest to my Palm Springs local resale and thrift store Revivals.
• WOOD STAND: Get wood moldings at your hardware store. Full-round molding for the legs, square ones for the X support underneath.
• HARDWARE, TOOLS & ACC.: You'll need screws, drill, drilling bits, screwdriver, wood glue, sand paper, saw, marking pencil, X-Acto, wood filler
• CRAFT SUPPLIES: Cardboard, empty plastic container (yogurt), duct tape, pebbles (dollar store, a few bags)
• FINISH: Kiwie Brown Shoe Polish, paper towels
HOW TO MAKE THE STAND
The idea of this project is to make an X-shape support for the bottom from square moldings and attach it to 4 rounded legs to achieve a mid-century modern look.
- Start by making a plan and measure everything. Since my fake planters* were not perfect cylinders, I had to compensate for the smaller bottom. I'm providing my basic plan so you can adapt it to your own case. (*I did 2 at the same time)
- Cut all your pieces, legs and bottom support.
- The first complicated thing to do is grooving the 2 pieces that form the X to insert one into the other and make a flat piece. I made repeated cuts with my hand saw. Detach the wood scraps with an X-Acto and smooth out. Try out the fit often until perfect match.
- Groove the ends in a concave shape, just enough to make the 4 ends of the X sit well on the rounded legs. As a head start, I used my saw to slightly groove out some of the wood. Then wrap sand paper on one of the round legs and use this as a sanding pole to get the exact same shape.
- At this point, it's easier to also sand everything that needs it before assembling the pieces.
- Make pilot holes for all the screwing to prevent wood splitting.
- Screw together the 2 pieces forming the X, in the middle.
- Screw the legs. But first, an advice: put wood glue before screwing. I forgot to do this myself and my final stand is a bit flimsy. Of course, once sitting on the floor, it stays put. But I wish it would be more secure and now that the screws are hidden with wood filler, sanded, and finished, it's too late.
- A little trick to help hiding the screws, make a second short hole on top with a bigger drilling bit, the same size as the screw head. You can then screw deeper and it makes room for the wood filler.
- Hide screws with wood filler and put the stand down.
- Adjust it shape so it's tidy and straight.
- Let the glue rest and wood filler dry out.
- Sand the excess wood filler.
PREPARE THE FAUX CACTUS
Measure how much height you need to raise the plant in the planter (or trash can). Keep about an inch from the border to be able to insert a cardboard circle and decorative pebbles. I used an empty yogurt container.
- Cut the container to the desired height. Make sure to have one side that fits your plant's bottom. Attach this "riser" to your plant with duct tape.
- Trace the top of your planter on cardboard and cut a circle, slightly smaller than your drawing to make it fit inside.
- Sit the plant inside the planter.
- Cut the cardboard circle in half, remove center to allow for the stems.
- Check the fit and adjust as needed.
- Put in place and secure with duct tape.
- Finish with pebbles to cover everything.
- Put aside.
FINISHING TOUCH
Once the the glue has set, the stand is steady, and you've sanded the wood filler excess, you're ready for the finishing touch.
- Stain the frame. Trick: don't fuss with stain or paint, just use brown shoe polish with a paper towel. Yes, it works!!! Unless you want a more expensive finish or smoother color. It does bring out the wood grain. I always keep a few tins of brown shoe shine in my craft box so all my wood projects look the same.
- Use a good chunk and spread it around everywhere.
- Repeat if needed.
- Beware, it stains easily. (I keep a couple of old beach towels for crafting projects.)
- If the final resting spot for the plant is delicate, don't stain under the legs and stick on some felt protectors to avoid staining a nice carpet for example.
- Put the planter on the stand.
- Position in place.
- Adjust the legs slightly if needed.
VOILÀ...
You're done!
I had a lot of fun doing this one. It took me the good part of one day. But that's probably because I thought it through while doing it, taking pictures, etc. Now with all these tips and tricks, your mileage might vary and it should be quicker!
Let me know how it turns out for you!
NOTE: I was making two planters-on-a-stand because I bought two different artificial plants at IKEA.