DIY lightbox studio for shooting my mid century products, almost free!
Silence... ACTION!

After ordering many product samples for the online store, I got really excited. Those would make much better pictures than the 3D mockups, still beautiful but fake. With real products, I could make all sorts of scenarios, group them, and have fun. Just to realize I didn't have the right tools to take great shots. My iPhone does a great job at taking the picture but for the setup, I wanted something more professional... without the cost!
That's went I turned to the web to get ideas on how to take great pictures without breaking the bank. I quickly found many tutorials on how to create a personal studio booth from scratch with common materials and easy to find accessories. The only obstacle? The starting point is a box but not any box... you need a very BIG box!!!
When being in Palm Springs for the winter recently, I ordered a nice mid century armchair for the bedroom. Although it required some assembly, it still came in a big box. That's when is struck me: perfect timing for the photo booth project. Let's give it a try!
This do-it-yourself lightbox project, or mini photo booth, is very simple and straightforward. I'll give you a step-by-step on how I did mine and a few tricks I found along the way. So smile, it's only fun!
First, a HUGE box.
Take a big cardboard box, any kind. The bigger the better but the bigger, the strongest it has to be. Before cutting holes, make a little plan and think upfront on how you'll be using and storing it. Make a short list of the features you'd like. That way, you won't find yourself with not enough good panels left to finish up if something goes wrong. Oh, and take time to measure, it's super useful!
Here's what my own requirements were:
• Fold flat for under-the-bed storage
• Offer 3 angles of lighting
• Provide different color backgrounds
I opted to buy and gather all my materials before cutting. I chose tissue paper for gift wrapping but wax or parchment paper could do the trick as well. I started from the dimension of the paper and made the holes slightly smaller to make room for taping. This has the extra advantage to be sure you won't need to tape 2 sheets together. To speed things up, use the 1st cut panel as a template for the others, a nice time saver.
Back it up


Since I will use different color backgrounds, the bottom could be left open. So my box folds from the sides and the top in a "U" shape. The back folds from the top and attaches to the bottom of the sides with custom tabs I made from scraps after cutting. They're taped to the back and go into slots cut from the sides. This is the secret sauce that holds the booth together and makes it possible for the whole thing to fold flat.
Lighting is everything


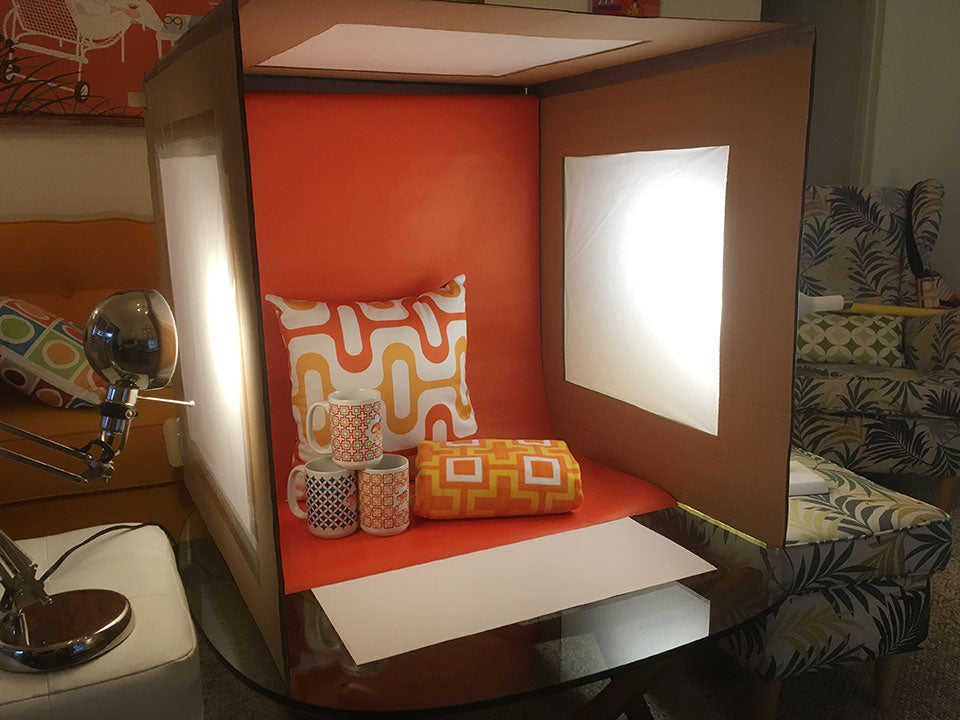
What makes a beautiful lighting is the diffused effect of putting some kind of screen in front of the light source. It spreads the light in a beautiful way and makes shadows smoother. In the photo, you can see I made openings on 3 sides. That's because I wanted to added possibility of lighting from the top.
In the end, it all folds flat which still amazes me! How cool is that!

Backdrops
For the interchangeable color backgrounds, I bought a few color wrapping paper rolls. They hang inside the top-back of the box using the same "tabs/slots" system I created for the back. I made one slot on each side in the top of the box where a longer tab gets inserted. Make sure to round the endsof these 2 tabs. They'll still hold the roll but won't prevent them from "rolling" smoothly. A bit in the same spirit of a paper towel holder. Contrary to the back tabs though, these are not glued or taped so they can be taken off for changing color roll or storage. I keep them in a Ziploc taped on the back of the box. When it's all setup, all you need to do is unroll the paper carefully from the top, without folding or crumpling it, and you'll have a beautiful seamless infinite backdrop!
THAT's the whole idea of the project after all!
When all is done

This is the first picture I took without much setup or thinking about it. Isn't it crazy how a simple box with tissue paper can make such a huge difference?
I still have to find the right light sources. Table or office lamps were not quite bright enough even after putting them very close to the "windows". But even then, the result is so much better than just shooting on any background or on the dinning table!
This is a great and easy project to do and could be even more useful then you'd think. If you ever sell anything on eBay or Facebook, great pics are often a deal breaker. Perfect for food as well or even a stop-motion photo project. Have fun building yours. Hey, it's almost free!
What you'll need
• A big big big box
• Duct Tape
• Cutter
• Ruler or measuring tape and pencil
• Scotch tape
• Thin white paper for diffusing light (tissue, rice, wax, parchment)
• Light sources (use LED to avoid heat on paper)
Shopping notes
• Box: free!
• White tissue paper: Dollar store $1/pack
• Color wrapping paper: Dollar store $1/ea (5)
• Duct tape: Dollar store $1
Total: $7